Python provisioning made easy!
provy is an easy-to-use provisioning system in python.
Turn that tedious task of provisioning the infrastructure of your website into a repeatable no-frills reliable process.
Disclaimer: all code samples in this page are brought to you by GitHub gists
What's provy and provisioning
According to Wikipedia, provisioning is "the process of preparing and equipping a network to allow it to provide (new) services to its users".
We'll draw from this concept the part of preparing and equipping.
provy is a infrastructure provisioning automation tool. Its main goal is making it easy to create highly-scalable architectures with simple scripts.
provy stands on the shoulder of giants! fabric for the networking part and jinja2 for templating capabilities.
A very simple, yet working example of a valid provyfile.py:
Installing provy
Before installing provy you will need to ensure you have swig installed, as m2crypto needs it. Here is how to install it in some platforms.
MacOSX
To install swig on a mac, the easiest way is to install using the homebrew package manager (which we will not cover here). After installing it, execute this command:
Just ensure that you have /usr/local/bin on your path.
Arch Linux
Swig is in the extra repository and can be installed with:
Ubuntu and Debian GNU/Linux
It is just an apt-get install away =)
Other platforms
If your platform is not listed above, try searching in your package manager for swig and install it given the search results.
Install provy
Now that you have swig, installing provy is as easy as:
It can be easily installed from source as well, like this:
As can be seen above, after being installed a provy command becomes available
provy is FOSS and you can find its source code at its github page.
Getting started
Starting to provision servers with provy is extremely simple. We'll provision a fairly scalable infrastructure (yet simple) for a Tornado website.
Tornado is facebook's python web server. It features non-blocking I/O and is extremely fast.
The solution
Below you can see a diagram of our solution:
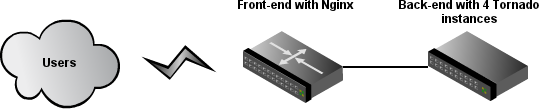
Our solution will feature a front-end server with one nginx instance doing the load-balancing among the tornado instances in our back-end server.
The back-end server will feature 4 tornado instances kept alive by supervisor (a process monitoring tool).
Create a file called website.py at some directory with this contents:
Yes, it is not a very involved example, but Hello World suffices for our purposes. This python application takes a port as command-line argument and can be run with:
The servers
Ok, now that we have a functioning application, let's deploy it to production.
First, let's create a local "production" environment using Vagrant. Using Vagrant is beyond the scope of this tutorial.
First make sure you have the base box installed. If you don't, use:
In the same directory that we created the website.py file, type:
This will create a file called VagrantFile. This is the file that configures our Vagrant instances. Open it up in your editor of choice and change it to read:
Ok, now when we run vagrant we'll have two servers up: 33.33.33.33 and 33.33.33.34. The first one will be our front-end server and the latter our back-end server.
Provisioning file
It's now time to start provisioning our servers. In the same directory that we created the website.py file, let's create a file called provyfile.py.
The first thing we'll do in this file is importing the provy classes we'll use. We'll also define FrontEnd and BackEnd roles and assign them to our two vagrant servers.
Even though our script does not actually provision anything yet, let's stop to see some interesting points of it.
You can see that our roles (FrontEnd and BackEnd) both inherit from provy.Role. This is needed so that these roles can inherit a lot of functionality needed for interacting with our servers.
Another thing to notice is the servers dictionary. This is where we tell provy how to connect to each server and what roles does it have.
We can run this script (even if it won't do anything) with:
Provisioning the back-end server
Let's start working in our back-end server, since our front-end server depends on it to run.
First we'll make sure we are running our app under our own user and not root:
Then we'll need to copy the website.py file to the server. provy can easily copy files to the servers, as long as it can find them. Just move the website.py file to a directory named files in the same directory as provyfile.py.
Now we can easily copy it to the /home/frontend directory:
The update_file method tells provy to compare the source and target files and if they are different update the target file. For more information check the documentation.
Next we must make sure Tornado is installed. provy already comes with a role that does that:
Now all we have to do is instruct supervisor to run four instances of our app:
Provisioning the front-end server
Ok, now let's get our front-end up and running. provy comes with an nginx module, so it is pretty easy configuring it.
We have to provide template files for both nginx.conf and our website's site. Following what Tornado's documentation instructs, these are good templates:
Save them as files/nginx.conf and files/website, respectively.
Now all that's left is making sure that provy configures our front-end server:
See how we passed the user name as an option to the nginx.conf template? provy allows this kind of template interaction in many places. For more information, check the documentation.
Running and verifying it works
We can now fire our brand new infrastructure and check that the website is working:
After these 3 commands finished running (it might take a long time depending on your connection speed), you should see Hello World as the result of the curl command.
provyfile and Runtime Arguments
provy uses a python module called provyfile.py in order to retrieve the definitions of your roles, servers and the relationships between them.

This is the overall structure of a provy provisioning file. The first imports will be very similar among most your provyfile.py files. You'll always import Role and most of the time will use one of the other built-in roles.
After the imports, come your Role Definitions. This is where you'll specify how you want your servers to be built. You can find more about how to build roles in the What are roles? and Using Roles in my Roles sections.
Last but not least, you describe your servers and how they relate to roles. This brings us to the AskFor parameter (provy.core.AskFor). This class allows you to specify that a given option for a given server should be filled at runtime, either by passing in the command line or by asking the user doing the provisioning.
AskFor takes two arguments: key and question. The key argument is needed to allow passing the argument when running provy (more on that in the next section). The question is used when provy asks the user running it for the parameter.
AskFor is really useful for sensitive data such as passwords. You don't want to expose this data in your provyfile in plain text. You just use an AskFor parameter for it and supply the information at runtime. Let's look at a sample of AskFor usage.
This parameter can be supplied twofold: if you don't specify it in the console when calling provy, you will be asked for it. If you need to specify it in the console, just use its key like this:
provy -s server -p password mysql-db-password=somepass
All arguments must take this form of key=value, with no spaces. The key must be exactly the same, case-sensitive.
Running provy
provy comes with a console runner. It's the same one we used in the Getting Started tutorial.
The console runner supports some options. For more information you can use the --help command. You should see output like the following:
The option you are most likely to use is the server option. It tells provy what servers you want provisioned.
As we saw in the provyfile and Runtime Arguments section, we can also supply AskFor arguments when running provy.
All arguments must take the form of key=value, with no spaces. The key must be exactly the same as the one in the AskFor definition, case-sensitive.
What are Roles?
Roles are the most important concept in provy. A role specifies one server capability, like user management or a package provider.
provy comes with many bundled roles, but you can very easily create your own roles. As a matter of fact, if you followed the Getting Started tutorial, you have already created two custom roles.
Creating new roles is as easy as creating a class that inherits from provy.Role and implements a provision method.
This method is the one provy will call when this role is being provisioned into a given server.
Using Roles in my Role
As you may have noticed, provy provides a special syntax for using other roles in your role. Say we need to use the AptitudeRole in our role. This is how we'd do it:
The using method of the Role class is a special way of using other roles. The reason for using it is that it maintains context and the provy lifecycle (more on both later).
If you just want to provision another role in your role, you can use:
The provision_role method does exactly the same as the using method, except it does not enter a with block. This should be used when you don't wnat to call anything in the role, instead just have it provisioned.
Custom Files and Templating
Some methods provided by provy (including update_file) support passing in options that may be used in templates.
provy uses jinja2 for templating, thus supporting if/else statements, loops and much more. It's advised that you take a look at jinja2 docs.
jinja2 will look for files in two different places. The first one and probably the one you'll use the most, is a directory called files in the same path as provyfile.py.
Any files you place inside this directory may be used as templates to be uploaded to the server being provisioned. Since provy is built on top of fabric, you can use its put method as well to put any file or folder to the server. It's advised to use the bundled methods that come with provy, though, as those are idempotent.
The other place you can put files is in a templates directory inside Role apps. The supervisor role uses this approach, if you want to take a look at an example. If you do place files in the templates directory, do not forget to call the register_template_loader method passing in the full namespace of your app (more details in the provy.more section below).
We used custom files in the Getting Started section to provide the needed configuration files for nginx.
provy.core and provy.more
provy is divided in two namespaces: provy.core and provy.more. It is divided like this to make it easier to find the roles you need.
provy.core features the code that actually makes provy run, like the console app or the base Role.
provy.more features every single specialized role that helps users in provisioning servers, like NginxRole or AptitudeRole.
Both will be documented here, even though you are advised to take a look at the code, since the docs might not be up-to-date yet.
Roles Documentation
* click on the role/module you want help with
Methods:
Supported Operating Systems
At this point, provy only supports Debian-based (debian, ubuntu) and CentOS distros. If you think your distribution should be here, please consider contributing.
This area details what features of provy are supported in each operating system.
Debian Distributions and Ubuntu
Currently all features are supported under debian distributions (including ubuntu).
The easiest way to verify what's available is checking the Roles Documentation section.
CentOS Distributions
Currently support to user management, git repository management and packaging (via pip and yum) are supported.
More supported features to come soon. If you think you can help improve this, please consider contributing.
provy Recipes
Django + Nginx same server
This recipe features a django website with 4 processes and 2 threads per process.
Nginx serves the requests via reverse proxy, while load balancing the 4 processes.
Each django process is a gunicorn process bound to a port ranging from 8000-8003.
Django's static files are served using nginx.
To read more about this recipe, click here
Who's using provy?
If you are using provy, please let us know and we'll put your company or website name here. This is a good way for us to gauge whether we are moving in the right direction.
Just join the mailing list and send us an e-mail. A form for joining the mailing list is available here.
Ideas, Features or Suggestions
If you have any ideas that can improve provy, or feature requests or even just some suggestion on the library or on this website, please let us know! We value your opinion more than anything else. If you don't have the time to contribute to the project, contribute with your ideas.
We have setup an easy-to-use way of providing feedback with the help of the nice people at uservoice.com.
You can go to our uservoice.com page at http://provy.uservoice.com and vote in the ideas given by users, thus helping us select ideas that will be implemented first.
Or you can just click on the button in the right-bottom of the screen that says feedback & support and tell us any number of things you think will help the project.
In the event that you not only want to send us your idea, but want to implement it and contribute to the project, keep reading the Contributing section.
Contributing
Contributions are very welcome. Specially roles. If you implement a role that you think others might be using, please contribute.
To contribute head to provy's github page, fork it and create a pull request.
Contributors will get listed here for their contributions.
The team behind provy (in order of joining the project):
Contacts
The place to create issues is provy's github issues. The more information you send about an issue, the greater the chance it will get fixed fast.
If you are not sure about something, have a doubt or feedback, or just want to ask for a feature, feel free to join our mailing list using the form below.
License
provy is licensed under the MIT License
Copyright (c) 2011 Bernardo Heynemann

Permission is hereby granted, free of charge, to any person obtaining a copy of
this software and associated documentation files (the "Software"), to deal in
the Software without restriction, including without limitation the rights to use,
copy, modify, merge, publish, distribute, sublicense, and/or sell copies of the
Software, and to permit persons to whom the Software is furnished to do so,
subject to the following conditions:

The above copyright notice and this permission notice shall be included in all
copies or substantial portions of the Software.

THE SOFTWARE IS PROVIDED "AS IS", WITHOUT WARRANTY OF ANY KIND, EXPRESS OR IMPLIED,
INCLUDING BUT NOT LIMITED TO THE WARRANTIES OF MERCHANTABILITY, FITNESS FOR A
PARTICULAR PURPOSE AND NONINFRINGEMENT. IN NO EVENT SHALL THE AUTHORS OR COPYRIGHT
HOLDERS BE LIABLE FOR ANY CLAIM, DAMAGES OR OTHER LIABILITY, WHETHER IN AN ACTION
OF CONTRACT, TORT OR OTHERWISE, ARISING FROM, OUT OF OR IN CONNECTION WITH THE
SOFTWARE OR THE USE OR OTHER DEALINGS IN THE SOFTWARE.